As
you've probably guessed by now, deploying a web application is just the
process of copying your web application files to a web server. By
taking this step, you accomplish three things:
You ensure your web applications are available even when Visual Studio isn't running.
You allow users on other computers to run your web applications. (The Visual Studio web server handles only local requests.)
Your
web application URLs will no longer need a port number (assuming your
web server is configured to use port 80, which is the standard port for
HTTP traffic).
Depending on your organization,
you may be in charge of deploying web applications, or a dedicated web
administrator may handle the process. Either way, it's worth learning
the deployment process, which is quite straightforward.
1. The Many Faces of IIS
IIS exists in several different versions. The version of IIS you use depends on the operating system you're using:
Windows Server 2003 uses IIS 6, which isn't covered in this book.
Windows Vista and Windows Server 2008 use IIS 7.
Windows 7 and Windows Server 2008 R2 use IIS 7.5
As a general rule, when
you want to publish your website, you should use a server version of
Windows to host it. Desktop versions, such as Windows Vista and Windows
7, are fine for development testing, but they implement a connection
limit, which makes them less suitable for real-world use. Most editions
of Windows 7 and Windows Vista limit IIS to ten simultaneous
connections, including Business, Professional, Enterprise, and
Ultimate. The Home Premium edition of both operating systems ratchets
the limit down to three simultaneous requests, while the Home Basic and
Starter editions don't support IIS at all.
Before you can start using
IIS, you need to make sure the web server computer has the required IIS
software. The following sections provide a high-level overview of the
process. They tell you where to go to find IIS and switch it on,
depending on the version of Windows that you're using.
|
Remember, if you just want to
learn about IIS and practice using its administrative tools and
configuring web applications, you can install IIS on your own local
computer and use it there.
|
|
2. Installing IIS in Windows 7 or Windows Vista
The process for enabling
IIS 7.5 (in Windows 7) or IIS 7 (in Windows Vista) is the same. In both
versions of Windows, IIS is included but not initially installed. To
switch it on, you need to follow these steps:
Click Start, and then click Control Panel.
Choose Programs and Features.
In
the task list (on the left), click the "Turn Windows features on or
off" link. Now you'll need to wait while Windows examines your system.
Find the Internet Information Services item near the top of the list (see Figure 1), and click it (so that the square next to the item becomes filled in).
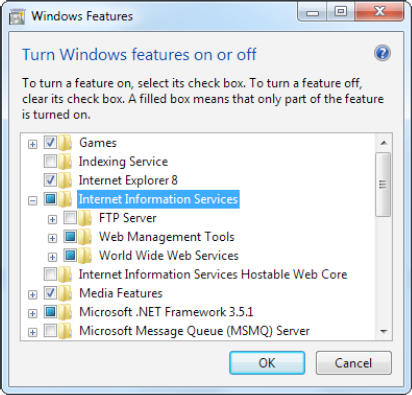
Windows
allows you to individually enable many additional IIS features. To see
them, click the plus box to the left of the Internet Information
Services item. This shows a tree of optional items (some of which are
shown in Figure 1),
including an FTP server, additional management tools, backward
compatibility with IIS 6, performance features, and quite a bit more.
Most of these optional features are outside the scope of this book
(although you'll use some of the security features later in this
chapter). To learn more about these settings and IIS administration in
general, consult a dedicated book about IIS.
NOTE
If you want to use
Visual Studio's IIS support, which allows you to create IIS virtual
directories directly from the New Web Site dialog, you need to select
the IIS 6 Management Compatibility item. You'll find it listed as one
of the optional items under Internet Information Services => Web Management =>
IIS 6 Management Compatibility ~ IIS Metabase and IIS 6 Configuration
Compatibility. It's not chosen by default.
Once you've chosen the IIS options you want, click OK to complete your configuration change.
If
you haven't already installed Visual Studio, you will need to install
the .NET 4 runtime after you install IIS. You can hunt it down on the
Web or use the Windows Update feature. The easiest approach is to use
the Web Platform Installer, which you can download from http://msdn.microsoft.com/netframework/aa569263.aspx.
|
As a quick test to find out whether IIS is installed, try firing up a browser and requesting http://localhost
on the current computer. The exact welcome page you see depends on the
version of IIS, but as long as you don't receive an error, you'll know
that IIS is installed.
|
|
3. Installing IIS 7 in Windows Server 2008
The initial release of
Windows Server 2008 used IIS 7, just like Windows Vista. However,
Windows Server 2008 was soon replaced by Window Server 2008 R2—a
refreshed edition with performance enhancements, bug fixes, and a few
new features. One of those features is IIS 7.5.
The setup and
configuration of IIS is essentially the same in both releases of
Windows Server 2008 (and with both versions of IIS). You use the Server
Manager to configure the server computer. The basic process is as
follows:
Click the Start button, and choose All Programs => Administrative Tools => Server Manager.
Choose the Roles node in the tree on the left.
Click
the Add Roles link in the right section of the window. This opens a
wizard that allows you to add a new role to your server.
Follow
the steps within the wizard until you reach the Select Server Roles
step. Check the Web Server role in the list of roles, and click Next.
You'll probably be prompted to install additional required roles—if so,
just accept the operation and continue.
After
you've installed any additional roles you need, you'll be prompted to
configure the Web Server role. As in Windows 7 and Windows Vista, you
can choose the specific features of IIS 7 that should be enabled.
Eventually, you'll end up at a summary page. IIS is now installed with the .NET 3.5 runtime.
|
For a little bit more hand-holding, you can refer to Microsoft's walk-through at http://tinyurl.com/3y5xqyo.
Although the details are the same, it includes a number of screen
captures that show the steps of the IIS installation process.
|
|
The Visual Studio test web
server gives you the easiest way to test and debug a web application.
However, it lacks some of the features of IIS (such as SSL and Windows
authentication), and it doesn't always behave in the same way as IIS
(for example, it runs your code under a more privileged user account).
For that reason, developers often choose to do their initial debugging
with the Visual Studio web server and then switch to an IIS test server
for full-scale tests.
However, Microsoft is
preparing a new tool that just might fill the gap. Called IIS Express,
it's a streamlined version of IIS that works with Visual Studio 2010.
It supports all of the more advanced features found in IIS, but it has
none of the administrative setup and configuration headaches. Although
IIS Express wasn't released at the time of this writing (it was about
to enter beta), you can search for it on the Web or read an early
preview at http://tinyurl.com/2f366eu.